
Unimog 4-Way Protection Valve: Fittings, Seals, and Rebuild Guide
For excellent discussion check out this thread on Benzworld. Thanks to everyone there for helping with this.
I filmed the entire diagnostic and rebuild process. It’s a deep dive, but it covers everything from finding the leak to installing the Megori rebuild kit.
Technical Reference: The 4-Circuit Protection Valve
Instead of trying to explain this complex valve myself, I’ve pulled the following descriptions directly from the technical literature.
Note: I cannot link to these sources because apparently they do not exist anymore. I spent a ton of time trying to find actual documentation with AI but was not successful. Apparently AI uses training data to give answers like those below. That is why AI is so fast. That data is old though, and a lot of times the current live web has changed and these documents discarded or put behind firewalls. So… AI can get us the quotes but not a link to an actual document on the “live web”. In this case I just have to trust it that these quotes are correct.
What the Manufacturer says:
According to the Knorr-Bremse Air Brake Equipment Manual (Section 4.1):
“The 4-circuit protection valve is designed to safeguard a multi-circuit air brake system. It ensures that even in the event of a failure in one or more circuits, the pressure in the intact circuits is prevented from dropping below a defined ‘securing pressure.’ This ensures the vehicle’s braking capability is maintained.”
The Functional Logic (Per Mercedes-Benz Manual):
In the Unimog 435 Workshop Manual (Group 42), the system logic is defined as follows:
“Air flows from the air dryer to the 4-circuit protection valve. The valve distributes the compressed air into four independent circuits:
- Circuits 1 & 2: Service brake system (Front and Rear axles).
- Circuit 3: Parking brake and trailer brake system.
- Circuit 4: Auxiliary consumers (Differential locks, engine brake, transmission shift).”
Downstream leaks:
If you are replacing these fittings because of a leak, keep in mind this note from the Wabco Maintenance Guide:
“The opening and closing pressures of the individual circuits are pre-set. Any leakage in the secondary circuits (3 or 4) will be isolated by the valve to protect the primary service brakes (1 and 2). If air does not reach the parking brake circuit, the protection valve may be performing its safety function due to a downstream leak.”
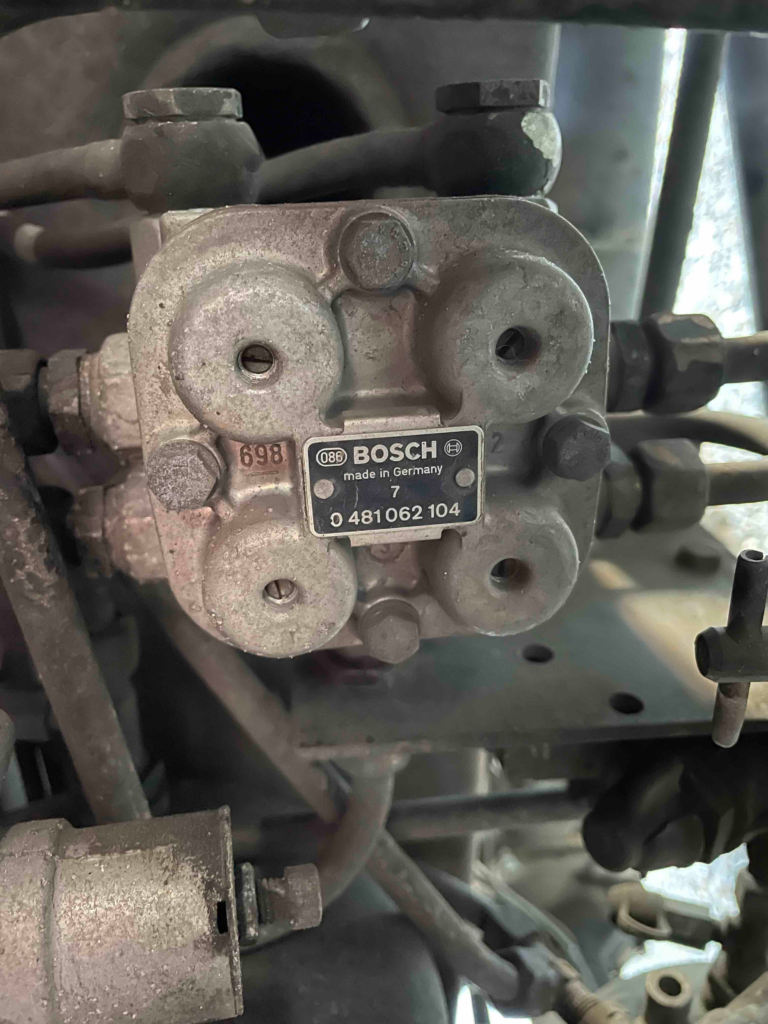
The valve Itself
Mercedes-Benz part number: A 002 431 04 06 64
Wabco part number (original part): 0481062104
Knorr-Bremse part number (replacement part): 0481062104
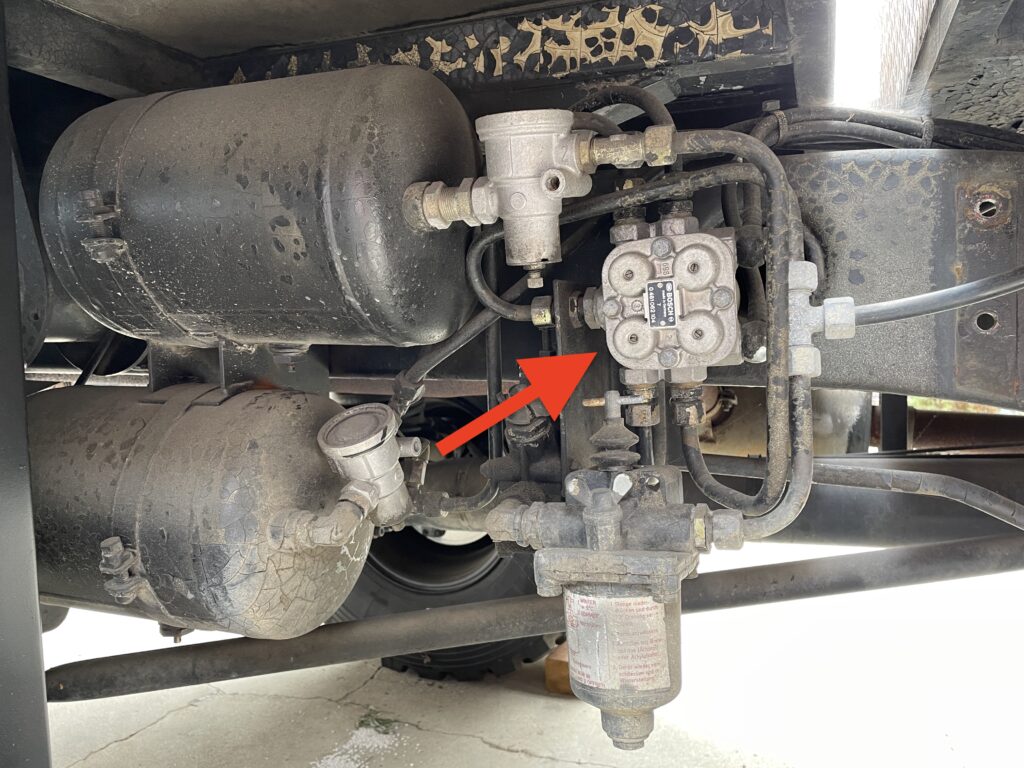
This is the original 4-way protection valve in its nest of hoses on my Mog. It looks like a heart.
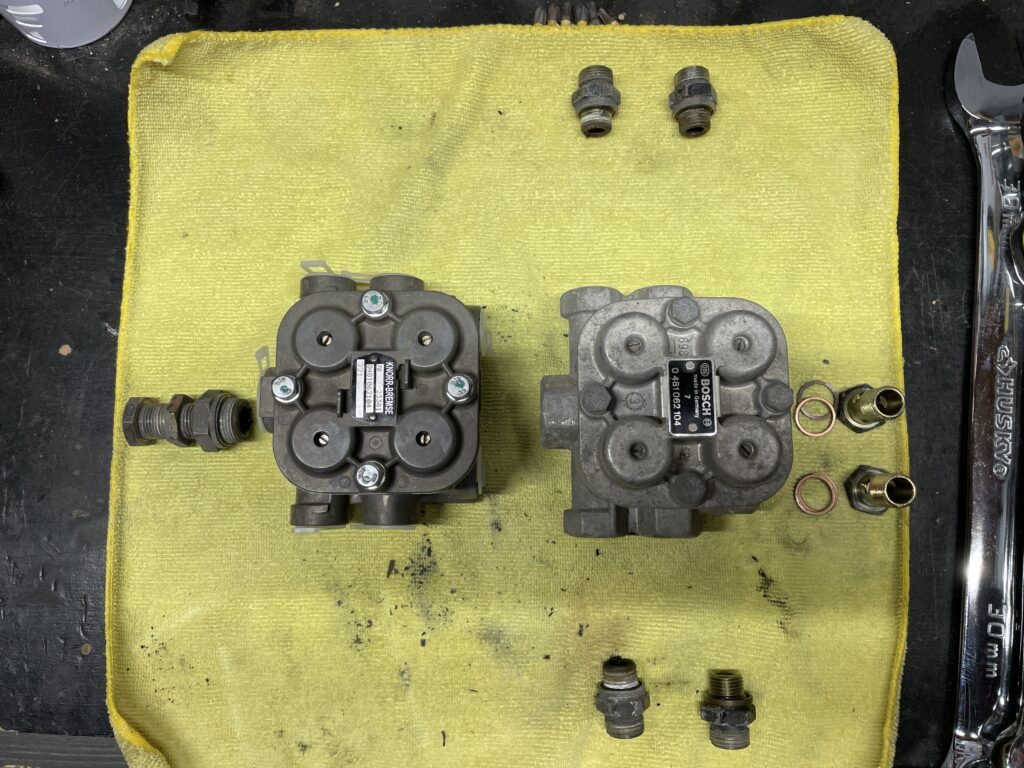
When you buy a new valve (in the US), it does not come with any fittings. Just the valve itself. Well, at least mine didn’t come with anything else. The old one is Bosch and the new is Knorr-Bremse which I was told is the new OEM replacement. Of course, these are Unimogs, so yours may be and probably is different. Make sure you check your VIN to get the right version of yours.

Removal and Installation
You can refer to the video for an actual account of the installation but I think it was pretty painless – maneuvering the wrenches around that nest of hoses was the hardest part. Finding all of the parts as discussed below, was a far greater challenge.
- Unhook all hoses
- Carefully pull out valve
- Carefully put new valve back in
- Hook up hoses
- Done
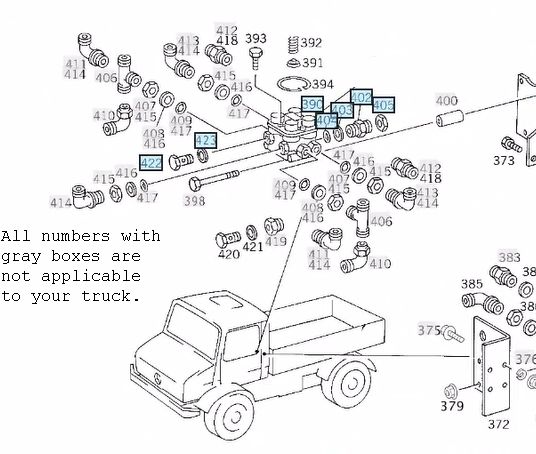
Parts legend & Diagram
When I change something like this, I would prefer to not have to ever do it again. The old valve lasted 40 years, why can’t the new one? The problem is that there are a lot of fittings that should probably be replaced as well if I want it to last. How sad would it be to put 40 year old o-rings back on this pretty new valve?
So that led me to the exercise below of documenting the different fittings and exact sizes so I could order these parts. I assume all of these parts are on a Mercedes parts diagram in the EDC with corresponding Mercedes part numbers. I am sure these parts could be ordered through a Mercedes dealer or even Expedition Imports, although I did not see them listed on their site.
I would still like to have the sizes documented so that maybe I or you can find and obtain them from other sources. After all, they are just basic hydraulic fittings right?

This is an illustration I made of the valve and the parts – I like pretty things.
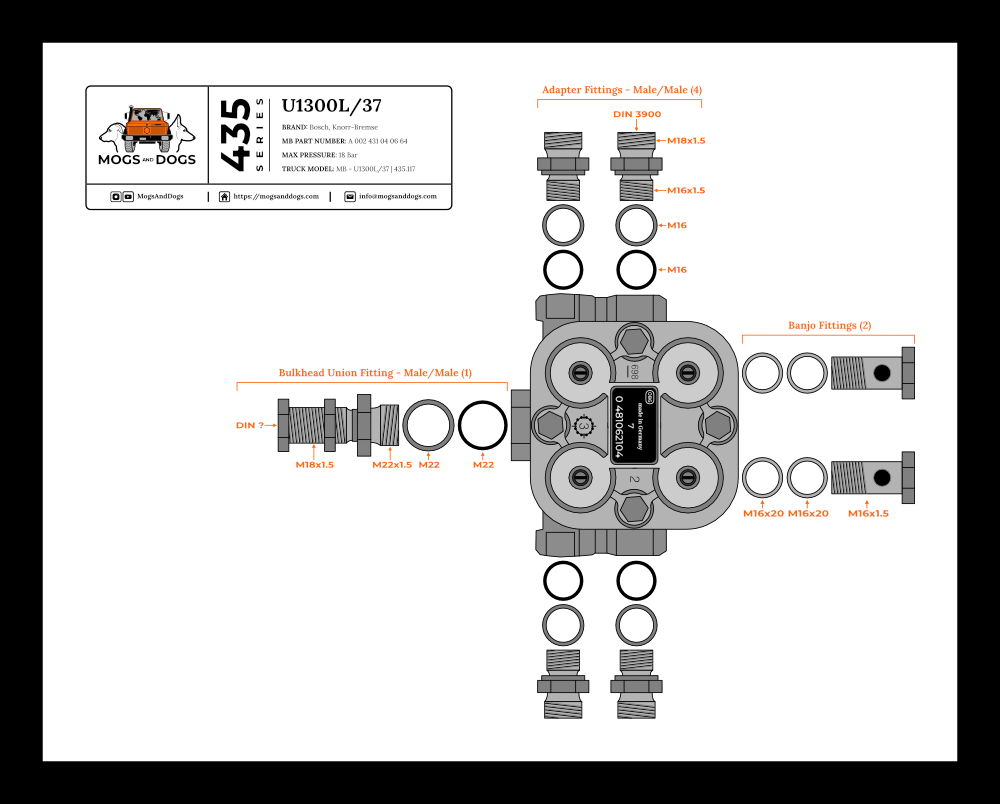
Parts list
IMPORTANT! 1C and 1D can be combined into the more current form: bonded washer. Same goes for 2B and 2C.
| Diagram # | Component | Part Number | Quantity | Source |
|---|---|---|---|---|
| Knorr-Bremse 4-way protection valve | A 002 431 04 06 64 | 1 | Expedition Imports | |
| FOUR CIRCUIT PROTECTION VALVE REPAIR KIT | 330150 | 1 | Megori Brake Systems | |
| 1A | M18x1.5 Bulkhead union locking nut | N000000 000571 | 2 | Expedition Imports |
| 1B | Male (DIN 2353) M18x1.5x34mm / Male M22x1.5x12mm bulkhead union fitting | A 002 997 1372 | 1 | Expedition Imports |
| 1C | M22 Port seals “compression seal” or “bonded sealing washer” | – | 1 | Belmetric |
| 1D | – | 1 | N/A | |
| not shown | 12mm (DIN 2353 12L) Cutting ring – This is named after the size of the hose (12mm). | 1 | Belmetric | |
| not shown | (DIN 2353) M18x1.5 Tube nut | 1 | Belmetric | |
| 2A | Male (DIN 2353) M18x1.5x11mm / Male M16x1.5x12mm adapter fitting | A 990 997 0703 | 4 | Expedition Imports |
| 2B | M16 Port seals “compression seal” or “bonded sealing washer” | 4 | Belmetric | |
| 2C | 4 | N/A | ||
| not shown | 12mm (DIN 2353 12L) Cutting ring – This is named after the size of the hose (12mm). | 4 | Belmetric | |
| not shown | (DIN 2353) M18x1.5 Tube nut | 4 | Belmetric | |
| 3A | M16 x 1.5 Banjo bolt (need length ???) | 2 | ||
| 3B | M16 x 20 copper crush washer or “sealing ring” | 4 | BelmetricCopper crush gasket (16mmx20mmx1.5)Copper crush gasket (16mmx20mmx1.5) |
Detail of “Bulkhead Union”

Detail of Adapter fitting

What is “DIN” all about?
The 5 inputs on this valve that are not banjo fittings are compression fittings. Below is a compression fitting. The cutting ring goes on the tip of the hose and up inside the cone shaped hole of the adapter fitting. Then the tube nut is tightened down, pulling and smashing the cutting ring (Ferrule Conical Ring) into the adapter fitting. Here is a great simple video showing how it works.

According to Gemini, the Unimog air system uses DIN 2353 standard fittings:
What it is: These are “bite-type” compression fittings with a 24-degree inner cone (often historically called Ermeto fittings).
The Threads: The ports on the Knorr-Bremse 4-way valve are metric straight threads, typically M16 x 1.5 (for circuits 3 & 4) and sometimes M22 x 1.5 (for the main supply/delivery lines), which seal with a copper or aluminum crush washer (DIN 7603) at the base.
I had Gemini check the live web for me to find a source for this information:
Finding a direct quote from Mercedes-Benz saying “The Unimog uses DIN 2353” is difficult because, to a German mechanical engineer in the 1980s, DIN 2353 was simply the air and hydraulic standard. It would be like an American manual specifying “use a standard garden hose thread”—it was so ubiquitous they didn’t always name the standard.
However, if you want bulletproof, linkable sources to prove that the heavy-duty truck air systems (and Knorr-Bremse valves specifically) utilize this standard, here are the industrial authorities you can confidently cite or link to on your site.
1. The Global Fitting Suppliers
The manufacturers who actually make these replacement fittings explicitly state their use in European commercial vehicle air systems.
- Hy-Lok USA (Industrial Fittings): They have a dedicated DIN 2353 Technical Catalog which states: “DIN 2353 tube fittings are most commonly used in the industrial hydraulics and pneumatics field… available in three series (LL, L, S).” * Tubes International: Their DIN 2353 Data Sheet confirms these are the “24° cone sealing and cutting ring” fittings used in commercial pneumatics.
2. The “L” vs “S” Series Mystery
If we are going to go with “DIN 2353” there is one crucial technical detail you need to know. The standard is split into two main series that look identical but have different wall thicknesses:
- L Series (Light): Used for standard pneumatics and low-pressure fluid (up to ~315 bar). This is what the Unimog air system uses.
- S Series (Heavy): Used for high-pressure hydraulics (up to ~630 bar). Used on Unimog hydraulic implements, but not the air brakes.
This is why buying fittings is a nightmare. An M16x1.5 thread exists in both series, but they take two different sized tubes (a 10mm tube in the L series, and an 8mm tube in the S series).
Light Series (L) – Standard Unimog Pneumatics
| Thread Size on Valve (Port) | Required Tube OD | DIN 2353 Series Code |
| M12 x 1.5 | 6mm | 6L |
| M14 x 1.5 | 8mm | 8L |
| M16 x 1.5 | 10mm | 10L |
| M18 x 1.5 | 12mm | 12L (Your hoses) |
| M22 x 1.5 | 15mm | 15L |
Heavy Series (S) – Unimog Hydraulics
| Thread Size on Valve (Port) | Required Tube OD | DIN 2353 Series Code |
| M14 x 1.5 | 6mm | 6S |
| M16 x 1.5 | 8mm | 8S |
| M18 x 1.5 | 10mm | 10S |
| M20 x 1.5 | 12mm | 12S |
| M22 x 1.5 | 14mm | 14S |
Reusing vs. Replacing the Cutting Rings (Steel Lines)
I’ll be honest: I ended up reusing the old cutting rings that were already crimped onto my air lines.
Because my Unimog uses hard steel air lines, I am told, removing the old rings isn’t just difficult—it’s permanent. Once a DIN 2353 cutting ring is tightened onto a steel line, it physically bites into the metal. The only way to remove it is to cut the end of the steel pipe off entirely.
If you don’t have enough slack in your hard lines to afford losing an inch, cutting them opens up a massive can of worms (like having to bend entirely new steel lines). Since my old rings and nuts were still in good shape, I cleaned them up, seated them into the new valve fittings, and they sealed up perfectly.
If your rings are mangled, or you are running new lines and need to buy replacements, I have linked the correct ones from Belmetric in the Parts List below.
I chose the “Single Bite” variant of the 12L DIN 2353 ring. However, if you are doing this job, know that they are Sized by the Hose. Do not buy an “M16” ring just because the valve port is M16. You must buy the ring that matches the Outside Diameter (OD) of your air line. For these lines, that is 12mm.
Port Seals: The Old Two-Piece System vs. Bonded Washers
In my teardown diagrams above, you’ll notice I labeled the seals going into the valve body (items 1C+1D and 2C+2D) as a two-piece system: a metal ring and a separate rubber O-ring. This is how the Bosch valve was originally assembled at the factory.
However, pneumatic sealing technology has evolved a lot over the last 40 years. That two-part system is now quite dated, and the industry standard has moved to an integrated solution called a Bonded Washer (sometimes called a Dowty seal).
A bonded washer is a single metal washer with a rubber seal permanently molded to the inside edge. When you tighten the fitting into the valve body, the rubber compresses to form a perfect, leak-proof seal without the risk of pinching a loose O-ring.
I used these bonded washers for my rebuild, and the system has been completely leak-free. I am not sure you can even get the old style. I have specifically linked the modern bonded versions from Belmetric in the Parts List.
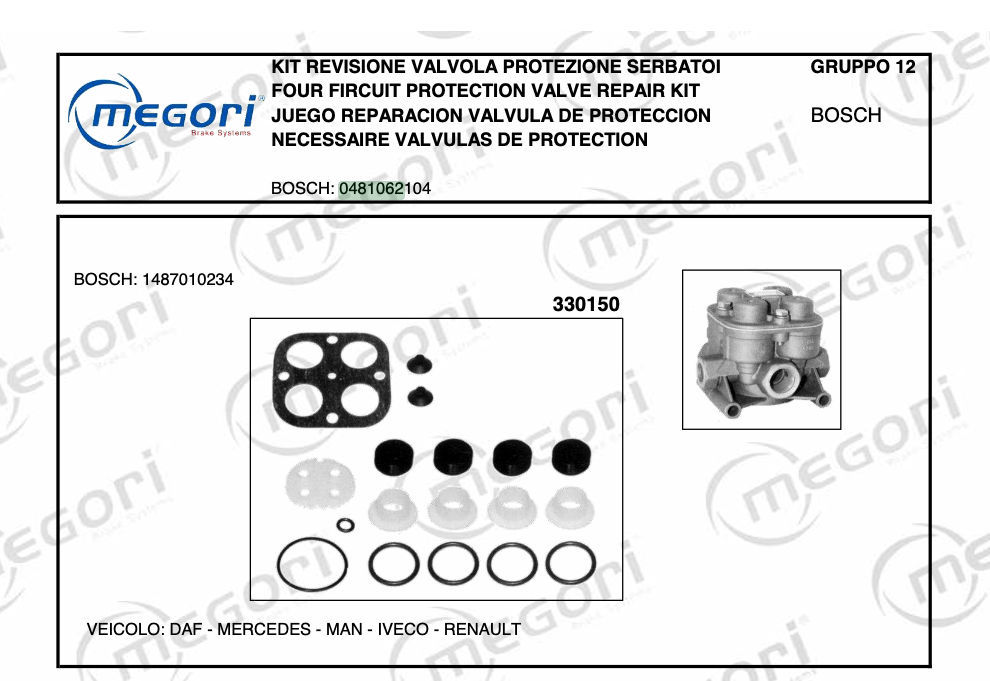
An alternate ending: rebuild kit
Spending the money and buying a completely new valve was my ultimate course of action. I think another completely rational course would be to buy a rebuild kit and rebuild the old valve. It does seem (to my simple mind) that these valves don’t have a lot that can go wrong with them except for the degrading rubber, plastic bits, and springs getting weak – unless there is corrosion, then I guess all bets are off.
So, I decided to track down a rebuild kit and rebuild my old valve and keep it as a back-up. Expedition Imports did not have this kit and I don’t think I reached out to Merex. I did, however, find an Italian company that makes a lot of old valve rebuild kits. The company is Megory Brake Systems. The catalog that includes this kit is here. The Megori part number is: 330150. You can see the Bosch valve part number printed on the catalog listing.
Megori said they do not usually sell directly to consumers but made an exception for me. I do not know why but I am grateful. It was about 90 EUR, so about a fifth the cost of a new valve.
I will not go into the actual rebuilding here – it is all covered in the video.


